> For the complete documentation index, see [llms.txt](https://docs.decenomy.net/llms.txt). Markdown versions of documentation pages are available by appending `.md` to page URLs; this page is available as [Markdown](https://docs.decenomy.net/~/changes/w0WCdKBHBZqhwJ4m8ogA/tutorials/decenomy-masternodes/masternode-deploy-on-vps-no-multinode.md).
# Masternode deploy on VPS ( no multinode )
**NOTE:** This tutorial is just for those coins that still don't have multinode built in their code. Once they have it this tutorial will not come in handy and you should refer to [Masternode Multinode easy to deploy](/~/changes/w0WCdKBHBZqhwJ4m8ogA/tutorials/decenomy-masternodes/masternode-multinode-easy-to-deploy.md) instead.
\
NB: Each masternode needs a unique IP address, it is not possible to install 2 or more masternodes of the same coin on the same server.
If you want to make more masternodes of the same coin, you need different servers or IPV6 support.
To run a masternode with a VPS we must first install Putty if we use Windows.
So now let's go to the browser and type [www.putty.org](http://www.putty.org/)
(We will need Putty to connect to our VPS).
We are now on this page, so click on the link.
As in the following image
Once this is done we will find ourselves on the download page, and then we choose the download for our operating system (in this case Windows 64-bit x86) and proceed with the installation.
Now that we have Putty on our PC, we need a virtual private server (VPS).
To get our VPS we need to purchase it from a hosting provider.
In this guide, we are going to use Vultr.
* So let's open our browser and type
* We will need to create an account and use either our credit card or PayPal as a method of payment. Once we are done, will will have access to the control panel.
Now let's choose the "VPS" option under the 'New Order' section.
On the next page, we seletc the **'CLOUD VPS S**' option
Next, we choose the server location, preferably one that is nearest to our geographical location. in this case, we chose London.
So we choose Server Type
* 64 bit OS
* Ubuntu
* 18.04 x64
Once this is done, let's choose Server Size (which are the technical specifications of our VPS).
In our case, we are going to choose the option that costs $10/month and click on the "Deploy Now" button.
We need to wait for the server installation process to complete. As soon as it's ready, we click on our new server.
Now we will find ourselves on the Server Information page
At the bottom left, we find our credentials.
* IP Address
* Username
* Password
We recommend that you save all the necessary data in a Notepad file because they will be used in the following steps.
Now let's go back and open our wallet (in this case Monk).
Once we have access to our wallet, we will need to create the collateral transaction by following the steps below:
* We click on receive
* We generate a new address
* We need to modify its label (we have chosen MN1 and remember how we labeled it for later use)
* We then copy the address
A Monk masternode currently requires 4000 Monk, which we need to send to ourselves, so:
* Click on Send in the left menu
* Paste the previously copied address
* We input the exact amount for our masternode (in our case 4000)
* We click send
We just created the collateral transaction!
After sending the coins to ourselves, we have to wait for 15 confirmations (about 15 minutes).
In the image below, we can see the transaction labeled MN1, payment to yourself.
Now let's go to the Debug console
* We click settings
* Debug
* Console
In the debug console we have to type the following commands in the bar below
* `getmasternodeoutputs`
* `createmasternodekey`
The first command returns the details regarding our collateral transaction. Whereas the second command generates a masternode key.
Then we copy the result of the following commands. (save the information in a Notepad file).
Now we can open Putty (which we had previously downloaded).
And let's open the Notepad where we saved the server credentials.
* We enter the IP address in the Host Name.
* We click on open.
If this is the first time we connect to the server, click on accept as seen in the pictured
Now Putty will ask us for the username and password, let's go to the Notepad where we have saved the credentials and insert them.
* log in as - root (press enter)
* root\@95.179.227.15's password: we enter the password
(while we type, nothing will appear. Do not worry it is normal and we press Enter).
We are now connected to our server (let's leave it open).
Let's go to decenomy GitHub, at this link [https://github.com/decenomy/MONK](https://github.com/decenomy/MONK) to download the script to install the masternode (in our case Monk).
We click in the "**contrib"** folder.
Now we click on **"masternodesetup"** folder
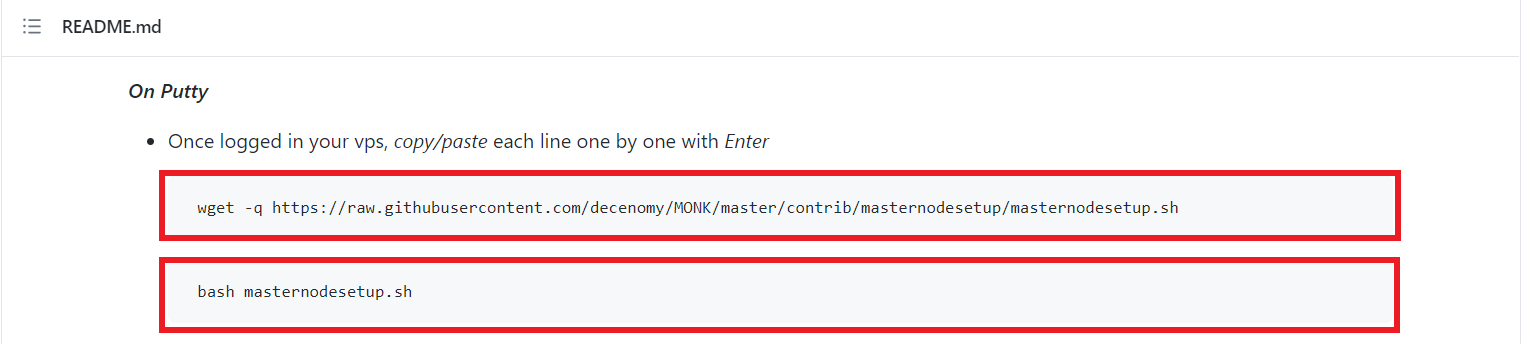
Scrolling down the page we find these commands to insert on Putty.
After copying the first command on GitHub, let's go back to Putty and paste it and hit enter.
Now we do the same operation with the second command and hit enter.
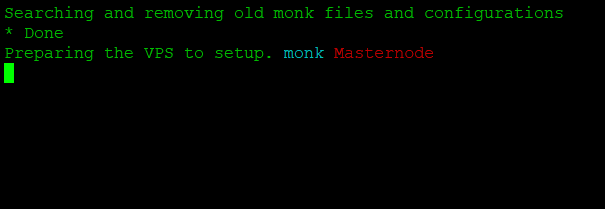
The installation of the masternode will then start.
After a short time, we will be prompted to enter the masternode key that we generated and saved in a note file earlier.
Let's copy and paste it into Putty and press enter.
If everything goes well, we will see this message.
Remember that the port, in this case, is 32270 (we will need it in a later step).
You can see it at the top right in the next image.
While waiting for the wallet on the VPS to complete the synchronization, we can finish the configuration in our local wallet.
In our wallet, click on the masternode.conf icon.
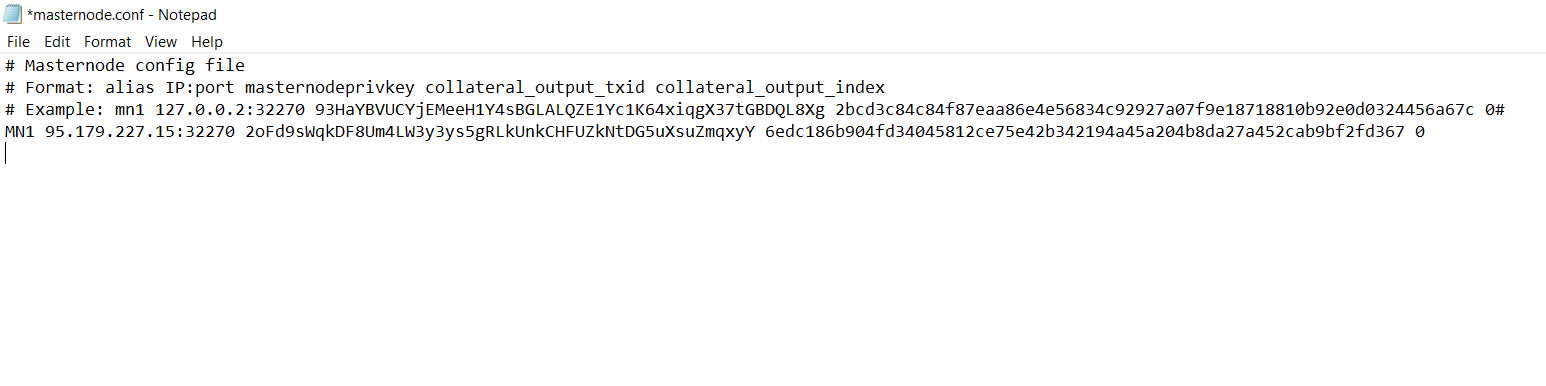
The masternodes configuration file will open in which we must enter the necessary data that will be used to start the masternode.
We must enter the following data:
* Name of the masternode (we had chosen MN1).
* IP address and Server port (the IP address 95.179.227.15 which we got from the Vultr dashboard and copied to our notepad file. The port in this case is 32270 as we have seen earlier).
* Masternode key 2oFd9sWqkDF8Um4LW3y3ys5gRLkUnkCHFUZkNtDG5uXsuZmqxyY (we saved a copy in a notepad file earlier in the tutorial).
* Transaction hash 6edc186b904fd34045812ce75e42b342194a45a204b8da27a452cab9bf2fd367 (the long string of letters and numbers we saved earlier in the Notepad)
* Output index 0
\
In the image below, there is a legend showing the last three steps.
Now all the above data must be inputted into the masternode.conf file. Ensure to carefully separate them with a space and without a new line.
NB: The IP and port must be separated by a colon.
We save the file, close the wallet, and restart it.
Now let's go to the left menu and click on masternodes. Then we start our masternode by clicking on the three dots on the right and then on start.
We now have our masternode running!
---
# Agent Instructions
This documentation is published with GitBook. GitBook is the documentation platform designed so that both humans and AI agents can read, navigate, and reason over technical content effectively. Learn more at gitbook.com.
## Querying This Documentation
If you need additional information that is not directly available in this page, you can query the documentation dynamically by asking a question.
Perform an HTTP GET request on the current page URL with the `ask` query parameter, and the optional `goal` query parameter:
```
GET https://docs.decenomy.net/~/changes/w0WCdKBHBZqhwJ4m8ogA/tutorials/decenomy-masternodes/masternode-deploy-on-vps-no-multinode.md?ask=&goal=
```
`ask` is the immediate question: it should be specific, self-contained, and written in natural language.
`goal` is optional and describes the broader end goal you are ultimately trying to accomplish on behalf of the user. GitBook uses it to tailor the answer towards what is most useful for that goal.
The response will contain a direct answer to the question and relevant excerpts and sources from the documentation.
Use this mechanism when the answer is not explicitly present in the current page, you need clarification or additional context, or you want to retrieve related documentation sections.
.png?raw=true)
.png?raw=true)
.png?raw=true)
.png?raw=true)
.png?raw=true)
.png?raw=true)
.png?raw=true)
.png?raw=true)

.png)
.png)
.png)
.png)

.png)
.png)

.png)
.png)
.png)
.png)
.png)